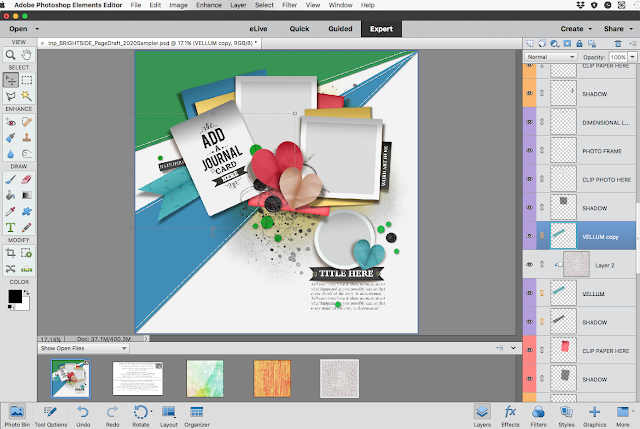
If you are not familiar with BLEND MODES in PHOTOSHOP or PSE then this tutorial is for you! It won’t be long before you are going to looooove these very powerful yet fun tools in your work space and you’ll be blending modes left right and centre and creating some really cool effects in your page designs!
Please note that unfortunately due to the nature of programs like Artisan you don’t have blend modes as an option in your work space so you won’t be able to achieve this look. However I have included dimensional shadowing in my templates so that you get a more realistic shadow to these elements so not all is lost, right?!
(For the purposes of this tutorial I'm using my 2020 Designers Sample found HERE and I am using PSE 15 to show you how it works but have included the PS workflows too. So if you wish to practice, grab that template now as it will be gone in March and replaced with a new sample. Note this tutorial works on any folded element in any of my templates too.)
Ok, so in my 2020 Designers sample template you will see a layer in the layers palette called Vellum. If you can imagine this is like a vellum piece of paper folded to look like a dimensional ribbon and is slightly transparent. These were designed to be re-colored to suit the kit or collection you are using.
Not everyone knows how to recolour and there are tonnes of different ways to achieve this. Below is a basic step by step and is a beginners version of recolouring your elements.
1- Click on the VELLUM LAYER to highlight that layer in your LAYERS PALETTE.
2- Navigate to the TASK BAR at the top of your WORKSPACE then select
ENHANCE/ ADJUST COLOR/ ADJUST HUE & SATURATION.
3- A fly away window will appear simply TOGGLE THE SLIDERS TO CHANGE THE COLOUR
then click OK.
IF YOU ARE WANTING TO CLIP A PAPER TO IT YOU’LL HAVE TO DO A DIFFERENT WORK AROUND TO RETAIN THE DIMENSIONAL FOLD. TRY THE FOLLOWING STEPS:
1- Click on the VELLUM LAYER to highlight that layer in your LAYERS PALETTE.
(See Step-1 Above)
2- RIGHT CLICK ON IT and from the fly away window click DUPLICATE.
3- DRAG & DROP the patterned paper into your workspace and CLIP TO THE BOTTOM VELLUM LAYER that you just duplicated.
(Note: You will see the top banner has covered the patterned paper, the next step will fix this.)
4- Click on the VELLUM COPIED LAYER to Highlight and then click
ENHANCED/ ADJUST COLOR/ REMOVE COLOR. This will turn the top banner to a grey tone.
If you use PS try IMAGE/ ADJUSTMENT/ DESATURATE.
5- Now you use your BLEND MODES. These are located at the top of your layers palette. I tend to use use MULTIPLY, OVERLAY or LINEAR BURN often, but this does depend on the look you are wanting to achieve and the type of pattern you are using, so have fun and experiment!
6- Once you have applied the blend mode of your choice you will need to adjust the lighting levels so you get a clear crisp fold appear on your paper rather than that grey tone that appears. You do this by navigating to the task bar and clicking ENHANCE/ ADJUST LIGHTING/ BRIGHTNESS & CONTRAST.
If you use PS try IMAGE/ ADJUSTMENT/ BRIGHTNESS/ CONTRAST or to adjust the tonal range try using levels by clicking the Levels icon in the adjustment panel then CHOOSE LAYER/ NEW ADJUSTMENT LAYER/ LEVELS and toggle the sliders for your desired look.
7- Then toggle the sliders in the fly away window to lighten the contrast. The effect is so realistic and
once you get the hang of it you’ll be well on your way to adding lots of dimensional realism to your pages.
So there you go, BLEND MODES are tonnes of fun and so so easy to use. Obviously different Photoshop Programs have different work arounds but this is the easiest way to achieve this technique and hope that the steps give you a good starting point to kick off from!
Thanks for stopping by and keep on scrapping your precious memories!


This is very helpful! Thank you Em!
ReplyDeleteAwesome tutorial !!! Thank you so much. You made it simple and fun :)
ReplyDelete